.jpg)


Retro Round Ripple Pillow
about 16 inches in diameter
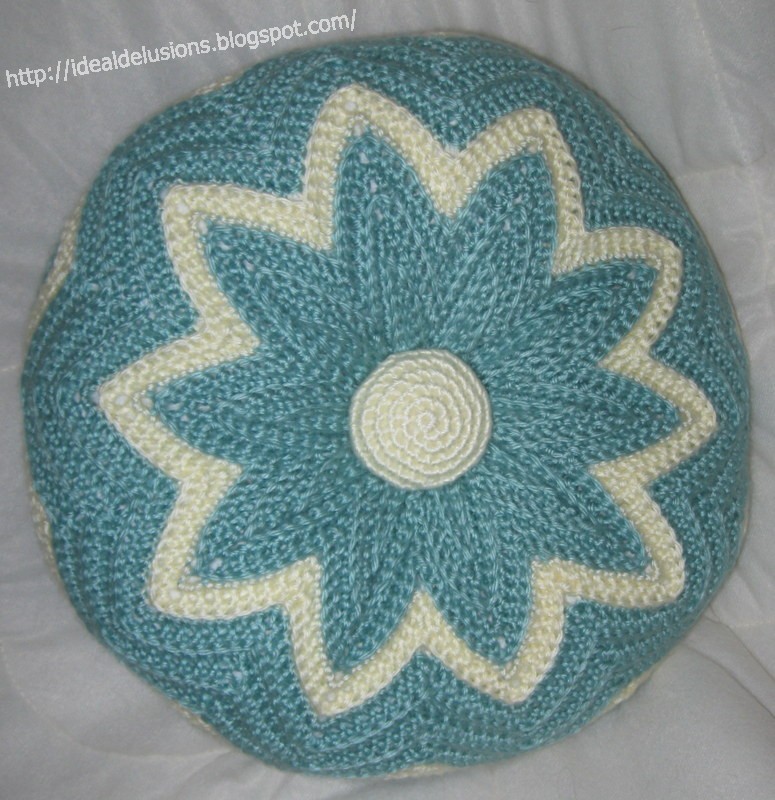
I know some of you might get excited over the pattern for this Retro chubby little pillow just like I was 50 years ago. The price of pillow forms is what I consider outrageous and round is hard to find so I have included instructions on how to make your own pillow form as well as your own big flat buttons.
Materials
About 8 ounces any color combo of Worsted Weight yarns.
15 or 16 inch round pillow form or 1 bag fiberfill and washable fabric
2 Large Buttons or can lids
Susan Bates crochet hook size 5.50 US size 9 / I -- UK size 5
Straight Upholstery Needle or long craft needle
NOTES:
Every round is joined,
Every round is turned,
Every round is single crochet,
Every round is worked in the back loop only. That is how you get the ridges.
(Yes I have done it without ridges but it loses the dramatic effect and I have also done it in Double Crochet with a smaller hook and less rounds)
This pillow itself is crocheted as a tube or sleeve, which is stretched over the pillow form, the ends gathered together, and buttons set, when finished.
If you are using more than one color you should choose your color pattern before you start. I was halfway finished with this pillow when the yarn shortage necessitated a color change.
This is the hardest part:
Ch 170, join with a slip stitch in the first chain to form a ring. Being very careful not to twist the chain. (view tutorial link join chains without twisting) https://www.youtube.com/watch?v=iU_1JIMxV-U
Round 1 Ch 1, sc in the next 6 stitches; 3 sc in next st (create point); sc in next 7 stitches; skip next 2 stitches (create valley), *(sc in next 7 sts, 3 sc in next st, sc in next 7 sts, skip 2 stitches) work from (*) around join with slip stitch in first sc. Turn 10 points.
Round 2 Working in back loop only, sl st in the next 2 sc. Ch 1, sc in same st, sc in next 6 stitches, 3 sc in next st (center st of point), sc in next 7 sts, sk next 2 sts (valley); *( sc in next 7 sts, 3 sc in center of point, sc in next 7 stitches, sk next 2 sts.-) continue from, * around skip last 2 sts. Join. Turn
From here each row is worked the same way for a total of 32 rounds.
To change colors: join yarn in the 7th stitch before the center stitch of any point.
This pattern has 32 rounds. Round # 16 is the half way point.
For a reversible pillow you would change to your second color on round # 17.

For stripes this is where you would reverse your colors sequence to make each side the same or you could continue with the same sequence to make a negative of the first side.
For stash busters you can also just let the colors work themselves out.
Don’t worry if it does not look wide enough this is normal. This process creates a tube or sleeve and although it looks narrow it will flatten out to the correct width.
When you finish the 32nd round, work 1 slip stitch in the center of each point to draw the end closed. End off and work in all ends.
How to make your Buttons (make 2)
Change to smaller hook if a tighter stitch is desired
But if you have the type can opener that cuts along the outside rim of the lid, not on the inside and leaves NO sharp edges, you can wash, save and use two can lids. On my pillow I used 2 Campbell's Soup can lids. (not the pop top kind) which are about the same size as a canning jar lid. Also you could use two very large "Shank" style buttons.
It is best to start with a slip loop so you can completely close the center hole.
8 sc in loop, do not join, place marker, work in spiral fashion
Round 1 working through both loops 2 sc in each st around (16 sc)
Round 2 (sc in next st, 2 sc in next sc) around (increase stitch), around (24 sc)
Round 3 (sc in next 2 sts, 2 sc in next st,) around (32 sc)
Round 4 (sc in next 3 sts. 2 sc in next st,) around (40 sc)
Rounds 5 - 9 work even. Leave very long tail for sewing.
Working even, sc around till piece is large enough to cover button front and wrap around enclosing the back.
Weave yarn tail in and out of last row around for drawstring. Place a lemon size ball of fiberfill in center of wrong side and place the can lid on top of the fiberfill. Draw up string enclosing the lid. Check for how puffy the button face is. If you want it flatter or puffier remove or add fiberfill till it looks like you want it to be. Stitch back of button closed with the tail of the yarn coming out at center back for sewing later.
How to make your pillow form
Sh-h-h-h I won't tell, but you do not have to buy new fabric for the casing as it should not show. You can always use "found" fabric but it should be similar in color so it does not "shine through". This is your chance to use that clean, old, unmatched, pillowcase or crib sheet. Or how about that bedsheet with the tear that you were saving for window cleaning. I don't think a regular cotton T shirt would adapt well as it may be too soft. However has the hubby outgrown his shirts? Don't throw them out ! Cut on the side seams and then across the shoulder to salvage the fabric used for the back. But make sure it is not his "Lucky Shirt" or no pillow, no matter how gorgeous, will save you. In lieu of prospects at home maybe a couple of "Dollar Store" cotton dishtowels as long as they are at least 20 inches wide.
Sh-h-h-h I won't tell, but you do not have to buy new fabric for the casing as it should not show. You can always use "found" fabric but it should be similar in color so it does not "shine through". This is your chance to use that clean, old, unmatched, pillowcase or crib sheet. Or how about that bedsheet with the tear that you were saving for window cleaning. I don't think a regular cotton T shirt would adapt well as it may be too soft. However has the hubby outgrown his shirts? Don't throw them out ! Cut on the side seams and then across the shoulder to salvage the fabric used for the back. But make sure it is not his "Lucky Shirt" or no pillow, no matter how gorgeous, will save you. In lieu of prospects at home maybe a couple of "Dollar Store" cotton dishtowels as long as they are at least 20 inches wide.
To make the form, stack your fabric, wrong side out, right sides together and lay it out flat on the table. Pin or secure it so it will not slide and cut about a 20-inch in diameter circle from this fabric. I used a pencil to trace my pattern around the outside of a 20-inch in diameter lampshade. It does not have to be exactly 20 inches but your pillow form casing must be several inches larger than the finished pillow to allow for the depth to make a fat pillow. Trust me on this one. You could use a similar size round object such as a salad bowl, the bottom of a small clothes basket, your Child's school compass or a pencil and a string or you could draw it freehand. (You-Tube actually has video on how to create a circle without a compass) If you are unsure try your circle pattern on a sheet of newspaper before you cut your fabric. When you get one that looks good use it for your pattern. Remember it does not have to be 100% exactly perfectly round as long as it is reasonably round or as my 6-year-old grandniece would say "Grown-up round."


After cutting sew around the edge with a 5/8 of an inch seam allowance remembering to leave about 5 inches open for stuffing. If you do not have access to a sewing machine, you can hand stitch it. You don't have to make teensy, tiny stitches, just sort of small and close enough together to keep the stuffing inside. Turn the pillow casing right side out and fold it in quarters so you can make reference points by marking the center, (at the point,) on the front and the back side of the pillow. You will need these reference points later for placing the buttons. Stuff the casing with about 3/4 of the bag of fiberfill, you want it nice and plump but save a couple of handfuls for the buttons. Stitch the opening closed.
NOTE:
For those of you with an adventuresome spirit: I have stuffed the crocheted pillow sleeve without a lining and I do not recommend that. It gets nasty the first time it is washed and since it is crocheted in one piece, it has no side seams, so it does not does not hold its shape. I already made that mistake and what a mess that was.
To finish the Pillow:
Thread straight upholstery needle or long craft needle with the yarn tail on the back of the button. If you cut it off, just run another strand under the stitches and let the ends hang out like a shoelace, then thread both strands into the needle. With pillow sleeve right side out, insert needle through center of sleeve and into the reference point you marked on the center of the pillow casing, pushing all the way through so it emerges through the reference point on the other side. You may need to wiggle it around a bit to hit the center. Pull the yarn through tightly but don't tie it off yet. Pull pillow sleeve up around pillow form but do not close it. Thread the needle with yarn tail from the second button and push through the pillow to the other side emerging under the center of opposite button. Letting the buttons hang loosely (the idea is to get them in the proper place before finishing) Use a double strand of yarn to draw the points of the pillow sleeve together, making sure both the button and the yarn tail from the opposite button are hanging outside the pillow sleeve open end, before you draw it closed. Tie it tightly, work in the end. You should now have a covered pillow with a yarn tail and a button hanging off each side. Pull the yarn tails from the buttons tightly to cinch up center of the pillow. Wrapping the yarn tails around under the bottom of the buttons and tie tightly several times. Repeat with the opposite button. Wind the yarn tail around the bottom of the button and the bury the end into the fiberfill.
This is a free pattern.
If you notice any errors please advise me so I can correct it.
I do not have a photo workshop for this pattern, as I had finished
the pillow before anyone asked about it, but I may post one at a later date.
 Matching blanket can be found here
http://idealdelusions.blogspot.com/2012/08/afghan-schematics-aqua-mist_17.html
I do not have a photo workshop for this pattern, as I had finished
the pillow before anyone asked about it, but I may post one at a later date.

http://idealdelusions.blogspot.com/2012/08/afghan-schematics-aqua-mist_17.html
My Grandma made on for me when I was about ten. I am going to have to see if my mom still has it and ask if I can have it , the next time I go visit.
ReplyDeleteMy Grandma made one for me when I was 10. I even got to pick out the color's I wanted.
ReplyDeleteThat's a lovely pillow!. Thanks for sharing the pattern.
ReplyDeleteA BIG smile was put on my face when I saw this. My Granny, who taught me to crochet, used to make these when there wasn't a pattern. I'm happy to see the pattern now and I will continue in her tradition of giving these as a gift with love. Thanks for the smile and bringing back memories of my Granny and the fun times we had crocheting.
ReplyDeleteI remember my grandmother making these. Loved then then, going to make new ones. She used the ends of canned biscuit cans to cover for her buttons.
ReplyDeleteI dearly love this pattern, and can't believe how easy it is! I, too, have memories of these pillows, and I love the colors you used in your photos. Have you ever tried to make one of these using a pre-made pillow form? If so, maybe you can give me some tips for using one. Thank you!
ReplyDeleteYou can buy a pillow form and I have used them way back when they were less expensive. Since I am now on a fixed income I try to keep costs down and shop my local Wal-Mart when I can. As you may guess, crafts are not Wal-Mart’s priority and selection is limited. If you purchase a round pillow form it would need to be 15 or 16 inches in diameter. When it comes to pillows I prefer fat verses flat. The reason I suggest cutting a 20 inch circle when making your own form is to allow for depth so you can stuff a fat pillow and still have it fit your crocheted pillow sleeve.
DeleteIf you purchase a prepared pillow form all I would suggest is that you use a tape measure and measure it west to east and north to south from the side seams, on pillow top and bottom, so you can determine and mark the exact center of the pillow on both sides to make it easier to correctly place the buttons.
Stunning, love this Cushion Cover pattern. Will make lovely gifts.
ReplyDeleteThis pillow pattern was a huge hit in the 50’s and 60’s. All the guys had their “Hotrod's” and all us “girls” were crocheting the pillows 1 for the parlor and 2 more to place in the back window of the boyfriend’s car. Drive-in Movies were big then so the pillows in the car were a “must have”.
DeleteI have looked for this pattern for over 2 years. My mom made them when I was a teenager and had lost the instructions after she passed and no one knew what I was talking about. THANK YOU for providing them for me again.
ReplyDeleteThank you for your note. So glad I could help.
ReplyDeleteThanks Doris, for your visit to Jam made to view my retro pillow. I'm very sorry for calling your blog Ideal Illusions. I don't know where I got that from, but I've corrected it now :O
ReplyDeleteI really love the cushion and I'm glad you've made the pattern available for retro nuts like me!
Love, Jen.
www.jammadestudio.blogspot.com.au
Hi Jen, Was cruising the WWW, plundering Pinterest, Facebook and others. Always looking for something fresh or unique, you know how it is. I really enjoyed your blog today. Love your work. Great photos, well written and you are an inspiration. I admit I was flattered you mentioned my blog and you know I did not even realize you had the blog name incorrect. I love to share my basic patterns. I find beauty in ordinary useful items. You have a great deal of ingenuity and your sense of style takes a basic item and makes it a work of art. Thank you for your visit. Hugs Dorie
DeleteI am planning to make some of these pillows but can't seem to envision how the pillow form is enclosed? Do you crochet around the form after the 16th row? Or is the opening on the 32nd round large enough to insert the form and then slip stitch the points and pull to tighten to finish? Thanks. Marilyn
ReplyDeleteThanks for your question. I can try to help.
DeleteThe pattern creates a sleeve like “tube.” that is the same width it’s entire length. The open ends of the tube will become the top and the bottom of the pillow.
To insert the form you gather the points on one end of the tube and draw it closed and secure it. This is the bottom and it now looks like a “bag.”
Make sure your “bag” has the right side facing out and insert the pillow form, flat side down, evenly inside the tube, so it looks like a cake.
The center of the pillow form should match up with the center of the “bag” (where you gathered it together) or where your hand would be if it was a clothing sleeve
The tube sides are now coming up around the sides of the pillow form like a sleeve comes up your arm.
Fold over the excess to meet in the center of the top of the pillow form.
Then gather the points on the top, draw it closed and secure
I do hope this will help
Thank you for your comment. Dorie
Thank you so much for the quick response. I now have a much clearer picture of the construction and can't wait to get started. I have some old pillowcases that have been waiting for a project like this! And I just bought a huge bag of fiberfill of which I only used a little for a small project and wondered what to do with the rest! So glad I found your website. Thanks again. Marilyn.
ReplyDeletePerfect, now just jump into your yarn stash, pick some wonderful colors, grab a couple of biscuit or soup can lids and you are ready to go. I would love to see it when you are finished. That is the only problem with this blog, I rarely get to see what others are making. Seeing someone else's work is an inspiration to me. There is an “E-mail Me” link in the right sidebar. It is private email. If you have any other questions just ask. Questions help me improve my pages. Thanks Dorie
DeleteI have been wanting to make a ripple pillow cover just like the one my grandmother made for me. She made hers flat and sewed it together, but I like yours better. I made a ripple afghan for my son and his wife, so now I can make the matching pillow cover. Thank you!
ReplyDeleteThis is an old pattern that seems to have fallen through the cracks so to speak. A while back I spent a long time looking for it. When I could not find one I decided I would have to make my own. I did discover that even if my “head” thinks it has forgotten my “hands” seem to find the path. I decided to write it down as I worked. When finished I decided to post it for others who may wish to make or re-make this old favorite. I am thinking now I could/should have made a circle then worked it upward like a bucket and finished by drawing the points together that it might save a considerable amount of work. I realize this method would probably make both sides somewhat different but would that be all that bad ? I may give some exercise to that idea.
DeleteThank you for your comment. Dorie
Hi.Love the pattern,quick question.....why do you say turn at the end of every round? Do you then work a round with the wrong side of your work facing you? I thought if the chain was joined you just keep crocheting round and round?..Many thanks .
ReplyDeleteJill.
The chain is joined so you do not have a side seam to sew when the rows are completed. The stitches are worked in the back loop only so the project is turned to create the ridges that are part of the pattern design.
DeleteThank you for your question.
Dorie
Thank you!!!!!! For some strange reason I read the pattern and then started crocheting in the front loops which didn't make much of a ridge and I had no need to turn my work.The penny has dropped,I understand and my cushion is well underway.Many thanks.
DeleteJill. xx
I put up an explanation of how I created my projects as an inspiration for anyone who would like to make a similar project. The basic structure is pretty much locked in but the the rest is always open to personal definition. I like the ridges so I work back loop only. It could be done working in both loops, no resulting ridge and I think it would be less flexible and maybe tighter but should still work. Might could be done in half double or even double crochet, this could be something to experiment with. One person said her grandma used biscuit can lids for the buttons, then there are soup can lids ? Or buy big buttons. I like the padded buttons so I go with canning jar lids which was what we used back then. The idea is find a pattern, put your creativity into it and make it your own. The whole idea here was to set up a matching pillow for the round ripple afghan. My little sis likes things to match.
DeleteThanks for your note. Dorie
hi, I'm finally getting around to working this project up after having bookmarked it a while ago. I've had a little trouble with going from Rnd 1 to Rnd 2 and I've frogged it 3 times before finally just fudging it. I chained 170 (carefully counting the 2nd & 3rd times thinking my count was off) and when I get to the end of Rnd 1 I have 3 empty ch's, I sl st'd to the 1st sc of Rnd 1, turned and then sl st'd across 2 st's, chained one but if I sc in that same stitch, my sc 3 (to form the point) is one stitch too soon.
ReplyDeleteI don't know if this was an error on my part or maybe there is an error in the text of the pattern. If there isn't I apologize.
Thank you for the pattern at any rate, it's beautiful and I hope I get it finished in time for my Gramma's birthday, she's the one who taught me how to crochet :)
I will review my pattern and if I find an error I will correct it.
DeleteThank you
Dorie
Thanks for sharing this pattern. I am finishing up a chevron afghan for my daughter in law and will have left over yarn. This would be great to go with her chevron afghan.
ReplyDeleteThese are fun to make, and they look really cute with a Round Ripple or even Regular Ripple afghan. Thanks for your note.
DeleteDorie
I have finished the pattern like it very much but when I pull the tip points together there is an opening between each point.? I don't see in the pattern where it says how to close up the edges of each point? What am I missing ?
ReplyDeleteHaving drawn to points together it makes a raised ripple effect which is kinda cool but your photo looks there are no open areas..
Thank you for any clarification in what step I've missed.
xstiks
No, you have not missed any steps. That is why it is so important to have a pillow form and not just try to stuff the sleeve. Once the points are drawn together tightly and the buttons are in place just pull the pillow into shape and pat it down a bit and it will sort of fold over itself. If the open areas are not to your liking you could probably stitch it up a bit in the back loops with and overcast stitch, on the inside, if you desire, but I have never done it that way. It would probably work out well for the first side, but not so easy for the second. I would say it would be a matter of personal choice. I have never found it necessary as the pillow will flatten a bit in use and the “openings” just seem to mash together.
DeleteThanks for your comment. Dorie
Thank you so much for this pattern. I made it in turquoise for my vintage Airstream. It is so stinking cute! I would just like to suggest that you let people know that you will actually be crocheting the top and bottom of the pillow, all in one piece. I did not realize this. So I thought I was creating the pattern from the edge to the center when in fact it was the other way around. When I realized this, I just picked up the stitches from the beginning row and repeated the patter again so it all worked out.
ReplyDeleteit is such a nice pattern and I just love the 3d effect! Thanks again!
Hi Doris..long time no talk. So sorry. But I just HAD to tell you how much I love your pillow and that you wrote the pattern out. Would you believe I STILL have two of the 'knitted' ones my grandmother made back in the 70's I think it was. I absolutely HAVE to pull them out of my truck and make your pillow form and finish them up. You have inspired me. Although I LOVE your colors. This will be my winter project thanks to you. Later...Lyn
ReplyDeleteSummer is the time for the beach and the garden. To hot to work under a lot of yarn but winter is a different story. That is the time to crochet, nice to have a lap warmer while you work. This is a really fun project. Thanks for your comments so nice to hear from you again.
DeleteHi, I am finally trying your pattern. I struggled with the chain, but finally got it right. I tried to follow the pattern exactly, but when i come to row two and turn, I don't come to a create point, as indicated in the pattern, i come to a create valley (skip 2). If i adjust the pattern to have a point when i turn, then i will have two points together. What am i doing wrong?
ReplyDeleteThanks, Yolanda
When your first round is correct, after you join and turn, Per RND 2: the first step is to slip stitch in the next two stitches. This is the first “valley” of round two. Chain 1 to get the height for the next round, then single crochet in the next 6 stitches which will bring you to the first point.
ReplyDeleteIf you still have a problem please use the email app in the right sidebar to contact me directly with any questions. Be sure to fill in your email address when you use the app. Do not post it here in the comments.
Thank you for asking Dorie
I saw this pillow in the movie "The Dressmaker." I can't wait to make it. It looks so comfy!
ReplyDeleteI was a teenager in the 50's. The days of drive in movies. Everyone had these fat little pillows in the car. No headrests in those old cars. Thanks for your comment Dorie
DeleteHi,
ReplyDeleteThe yarn I'm using is making the pillow a bit on the small side, I wondered if it would be possible to enlarge the pattern so that it has 12 points, if so would that require an extra 28 stitches?
Thanks K
I am really the worlds worst at math but with a calculator I find that if 170 stitches gives you 10 points, that would be 17 per point or a total 34 more stitches for 2 more points. Thank you for your comment.
DeleteIs the errata mentioned on Ravelry (provided it is correct) now included in the pattern? Thank you... Megan
ReplyDeleteI apologize but I do not understand your question. This pattern is complete as posted. Thank you for asking
DeleteThis is great! I have a similar pillow which my mother made in the 1970's and it's lonesome for a partner. I agree about the cost of round pillow forms and appreciate your thoughtfulness in providing a pattern for the pillow form as well. You've brightened my day considerably! Thank you!
ReplyDeleteAs you have brightened mine. I love these fat little pillows with the Round Ripple Afghans. But on a fixed income my ideas are larger than my pocket change. Creativity sometimes requires improvisation don't you agree? Than you for your note
Deleteamazing retro pillow collection. I really like the chevron style. I made them for myself. You can check it out: http://hacksdiys.com/home-living/decoration/how-to-make-a-chevron-pillow-covers/
ReplyDeleteYou will find a lot of approaches after visiting your post. I was exactly searching for. Thanks for such post and please keep it up. Great work. silk bed sheets queen
ReplyDeleteNice Digital Fabric Printers blog and i will share to my friends. Also i suggest Pillow Cover Printing.
ReplyDeleteExcellent. Thanks for all your work in creating/sharing so much new material with us!
ReplyDeleteI'm looking forward to more.
travel pillows
Thank you for your comment. I am glad you enjoyed the pattern.
ReplyDeleteDank je Doris, voor het patroon. In het klein maak ik een pannenlap.
ReplyDeleteWordt gebruikt in het "verre" Nederland.
Gr Mieke
Thank you for your note
ReplyDelete